<Getting started
We're going to through the creation of an entire pod using pod lib create to bootstrap the process. So let's start with the initial command:
pod lib create MyLibrary
Note: To use your own pod-template you can add the parameter
--template-url=URLwhere URL is the git repo containing a compatible template.
Second Note: you can press return to select the default (underlined) option.
<Objective-C or Swift
The first question you're asked is what language you want to build a pod in. For both choices CocoaPods will set up your library as a framework.
<Making a Demo Application
The template will generate an Xcode project for your library. This means you don't have to go through creating a new project in Xcode.
If you want to have an example project for pod try MyLib or need to have your library's tests run inside an application ( interaction tests, custom fonts, etc ) then you should say yes. A good metric is "Should this Pod include a screenshot?"; if so, then you should have a demo.
<Choosing a Test Framework
You should be testing your library. Testing ensures stability for people using your library. In open source libraries this means people can make changes knowing that they haven't broken implicit expectations. We recommend using a testing framework rather than relying on Apple's XCTest but that is included. In Objective-C we include a choice of two popular testing frameworks; Specta/Expecta and Kiwi. If you can't decide, use Specta/Expecta.
A light-weight TDD / BDD framework for Objective-C & Cocoa.Specta/Expecta
GitHub repo
Kiwi is a Behaviour Driven Development library for iOS development. The goal is to provide a BDD library that is exquisitely simple to setup and use.Kiwi
GitHub repo
The major differences is that Kiwi is an all-in-one approach to Stubs/Mocks/Expectations whereas Specta/Expecta is a modular approach through different Podspecs. We include all the necessary includes and setup for your testing framework in MyLib-Tests.pch so that you don't have to include them in each file.
In Swift we only offer the choice of Quick/Nimble as this looks to be the dominant testing library.
<View-based Testing
Depending on what library you are building you may find Snapshot based testing to be a smart way to verify the results of different actions on your views. We recommend using FBSnapShotTestCase, if you are using Specta/Expecta then we include a Pod to improve the syntax.
<Prefixes for Objective-C
To wrap up an Objective-C project we want to know your class prefix. This means that we can make all the classes generated by CocoaPods fit in with your style, also all classes generated from inside Xcode will start with your prefix. We know that Apple is deprecating prefixes, but in reality they still have their place in Objective-C codebases.
<The Pod Lib Create Template
With the questions over, we run pod install on the newly created Project. Let's look at the results:
$ tree MyLib -L 2

  MyLib
  ├── .travis.yml
  ├── _Pods.xcproject
  ├── Example
  │   ├── MyLib
  │   ├── MyLib.xcodeproj
  │   ├── MyLib.xcworkspace
  │   ├── Podfile
  │   ├── Podfile.lock
  │   ├── Pods
  │   └── Tests
  ├── LICENSE
  ├── MyLib.podspec
  ├── MyLib
  │   ├── Assets
  │   └── Classes
  │     └── RemoveMe.[swift/m]
  └── README.md
We've tried to keep the amount in the root folder minimised, You will see the following files:
-
.travis.yml- a setup file for travis-ci. -
_Pods.xcproject- a symlink to your Pod's project for Carthage support -
LICENSE- defaulting to the MIT License. -
MyLib.podspec- the Podspec for your Library. -
README.md- a default README in markdown. -
RemoveMe.swift/m- a single file to to ensure compilation works initially.
and the following folders:
-
MyLib- This is where you place your library's classes -
Example- This is the generated Demo & Testing bundle
<Putting your Library Together
CocoaPods will open your Xcode project straight away; from there you can edit all of the files generated by CocoaPods. Let's look at an expanded version of Xcode:
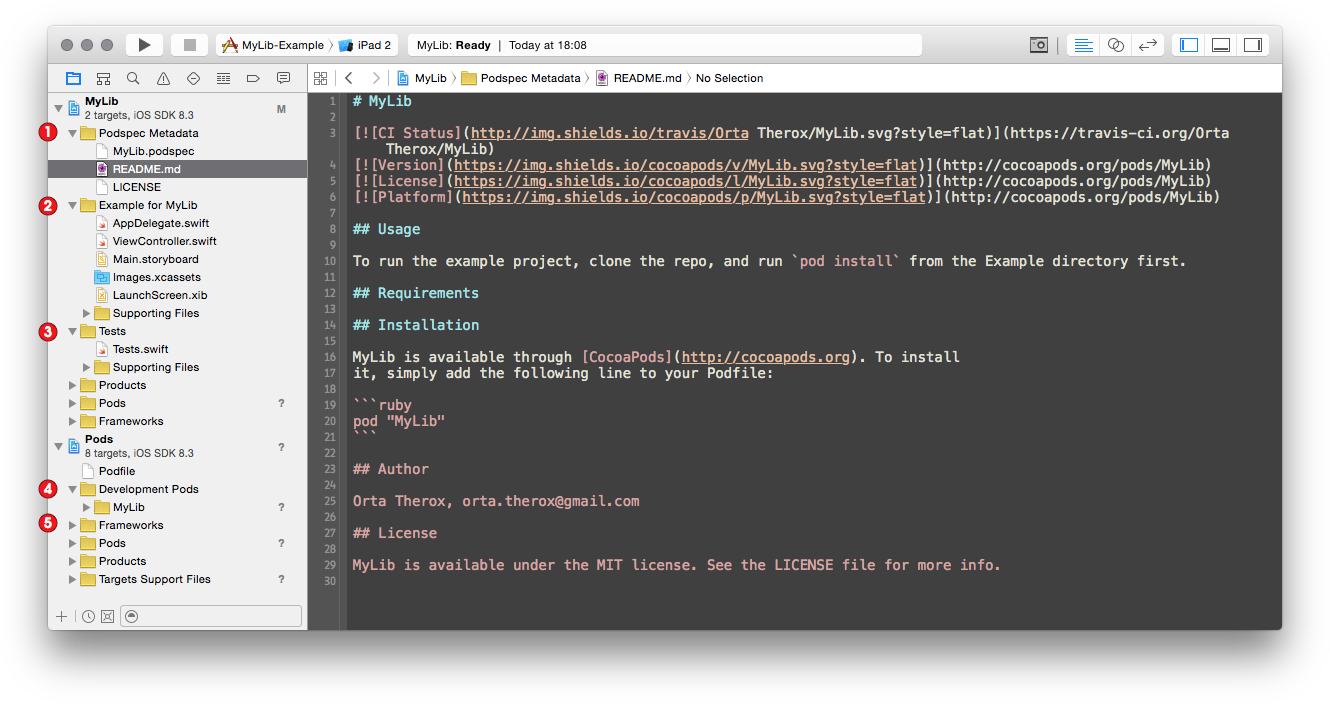
- You can edit your Podspec metadata, this lets you change your README and Podspec.
- This is the Demo Library, you will be missing this if you didn't say yes to it.
- Here is a stubbed out test spec for the framework you had chosen earlier.
- This is the Development Pods section, and actually where you can work on your library. See below for more information.
- Finally the Pods used in setting up the project.
It's worth mentioning here, as this catches people quite often, a Swift library needs to have its classes declared as public for you to see them in your example library.
Development Pods
Development Pods are different from normal CocoaPods in that they are symlinked files, so making edits to them will change the original files, so you can work on your library from inside Xcode. Your demo & tests will need to include references to headers using the #import <MyLib/XYZ.h> format.
[!] Note:Due to a Development Pods implementation detail, when you add new/existing files toMyLib/ClassesorMyLib/Assetsor update your podspec, you should runpod installorpod update.
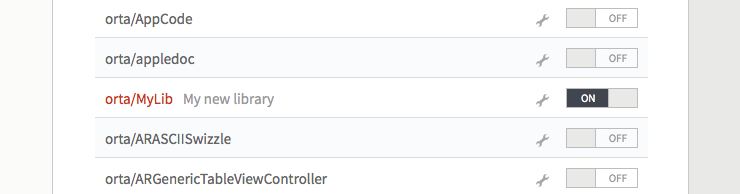
<Adding Travis CI
The template includes a .travis.yml file that will run the default tests included in the project. If you have an open source repo on GitHub, open your profile on Travis CI and turn the library on.
<Deploying your Library
So you've got your library ready to go. First you should check if the Podspec lints correctly, as you can't deploy with errors. This can be done with two methods, pod lib lint and pod spec lint. The difference between them is that pod lib lint does not access the network, whereas pod spec lint checks the external repo and associated tag.
If you're deploying an Open Source library to trunk, you cannot have CocoaPods warnings. You can have Xcode warnings though. You should continue to the getting started with trunk guide to deploy to the public.
If you're deploying to a private Specs repo, you will need to have already added that repo. See the guides on Private Specs Repos to set that up. If you are deploying to an existing Private Repo, use this command to deploy:
pod repo push SPEC_REPO *.podspec --verbose
<Done
👍